> ## Documentation Index
> Fetch the complete documentation index at: https://docs.zerotwo.ai/llms.txt
> Use this file to discover all available pages before exploring further.
# Sandbox
***
The sandbox is the boundary that lets the agent act autonomously without giving it
unrestricted access to your machine. When a local chat runs commands in the
**ZeroTwo desktop app**, **ZeroTwo desktop app**, or **desktop app**, those commands run inside a
constrained environment instead of running with full access by default.
That environment defines what the agent can do on its own, such as which files it
can modify and whether commands can use the network. When a task stays inside
those boundaries, the agent can keep moving without stopping for confirmation. When
it needs to go beyond them, the approval flow takes over.
Sandboxing and approvals are different controls that work together. The
sandbox defines technical boundaries. The approval policy decides when the
agent must stop and ask before crossing them.
## What the sandbox does
The sandbox applies to spawned commands, not just to built-in file
operations. If the agent runs tools like `git`, package managers, or test runners,
those commands inherit the same sandbox boundaries.
ZeroCode uses platform-native enforcement on each OS. The implementation differs
between macOS, Linux, WSL2, and native Windows, but the idea is the same across
surfaces: give the agent a bounded place to work so routine tasks can run
autonomously inside clear limits.
## Why it matters
The sandbox reduces approval fatigue. Instead of asking you to confirm every
low-risk command, the agent can read files, make edits, and run routine project
commands within the boundary you already approved.
It also gives you a clearer trust model for agentic work. You aren't just
trusting the agent's intentions; you are trusting that the agent is operating
inside enforced limits. That makes it easier to let the agent work independently
while still knowing when it will stop and ask for help.
## Getting started
The default permissions mode applies sandboxing automatically.
### Prerequisites
On **macOS**, sandboxing works out of the box using the built-in Seatbelt
framework.
On **Windows**, ZeroCode uses the native [Windows
sandbox](/windows/windows-sandbox#windows-sandbox) when you run in PowerShell and the
Linux sandbox implementation when you run in WSL2.
On **Linux and WSL2**, install `bubblewrap` with your package manager first:
```bash theme={null}
sudo apt install bubblewrap
```
```bash theme={null}
sudo dnf install bubblewrap
```
ZeroCode uses the first `bwrap` executable it finds on `PATH`. If no `bwrap`
executable is available, ZeroCode falls back to a bundled helper, but that helper
requires support for unprivileged user namespace creation. Installing the
distribution package that provides `bwrap` keeps this setup reliable.
ZeroCode surfaces a startup warning when `bwrap` is missing or when the helper
can't create the needed user namespace. On distributions that restrict this
AppArmor setting, prefer loading the `bwrap` AppArmor profile so `bwrap` can
keep working without disabling the restriction globally.
**Ubuntu AppArmor note:** On Ubuntu 25.04, installing `bubblewrap` from
Ubuntu's package repository should work without extra AppArmor setup. The
`bwrap-userns-restrict` profile ships in the `apparmor` package at
`/etc/apparmor.d/bwrap-userns-restrict`.
On Ubuntu 24.04, ZeroCode may still warn that it can't create the needed user
namespace after `bubblewrap` is installed. Copy and load the extra profile:
```bash theme={null}
sudo apt update
sudo apt install apparmor-profiles apparmor-utils
sudo install -m 0644 \
/usr/share/apparmor/extra-profiles/bwrap-userns-restrict \
/etc/apparmor.d/bwrap-userns-restrict
sudo apparmor_parser -r /etc/apparmor.d/bwrap-userns-restrict
```
`apparmor_parser -r` loads the profile into the kernel without a reboot. You
can also reload all AppArmor profiles:
```bash theme={null}
sudo systemctl reload apparmor.service
```
If that profile is unavailable or does not resolve the issue, you can disable
the AppArmor unprivileged user namespace restriction with:
```bash theme={null}
sudo sysctl -w kernel.apparmor_restrict_unprivileged_userns=0
```
## How permissions work
Use the permissions control for your surface to change how ZeroCode handles local
actions.
Approvals determine when ZeroCode pauses before an action, while the sandbox
determines which files and network resources commands can access. When an
approval offers different scopes, such as approving once or for the session,
choose the narrowest scope that lets the task continue. Keep the project
boundary as the default; use separate projects or worktrees instead of
broadening access across unrelated repositories.
ZeroTwo Work runs code and shell commands in a managed, isolated environment.
Workspace policy and tool-specific controls determine which capabilities are
available. When the setting is available, use **Settings > Data controls > Work
network access** to manage network access for code and shell commands. Turn on
**Allow public internet access** to let those commands reach the public
internet. When it's off, commands can reach only required hostnames from a
managed allowlist.
Web search, plugins, and the remote browser have separate controls.
Changes take effect after the current code or shell run finishes and Work
refreshes its execution environment. ZeroTwo web doesn't expose the local
ZeroCode sandbox or approval-mode selector.
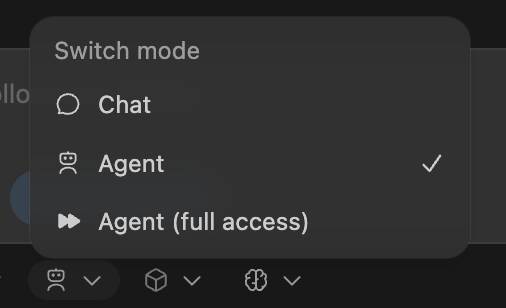
In the ZeroTwo desktop app, use the permissions control beneath the composer.
Depending on your configuration, the menu can include **Ask for approval**,
**Approve for me** for eligible approval requests, **Full access**, and named or
custom permissions profiles.
In the CLI, enter
[`/permissions`](/developer-commands#cli-update-permissions-with-permissions)
to open the permissions picker and change the active permissions profile.
In the desktop app, use the permissions control beneath the composer.
Depending on your configuration, the menu can include **Ask for approval**,
**Approve for me** for eligible approval requests, **Full access**, and named or
custom permissions profiles.
 ***
## Configure defaults
To start with the same behavior every time, set defaults in `config.toml`.
[Config basics](/config-file/config-basic) explains how it works, and the
[Configuration reference](/config-file/config-reference) documents the exact keys for
`sandbox_mode`, `approval_policy`, `approvals_reviewer`, and
`sandbox_workspace_write.writable_roots`. Use those settings to decide how much
autonomy the agent gets by default, which directories it can write to, when it
should pause for approval, and who reviews eligible approval requests.
At a high level, the common sandbox modes are:
* `read-only`: The agent can inspect files, but it can't edit files or run
commands without approval.
* `workspace-write`: The agent can read files, edit within the workspace, and run
routine local commands inside that boundary. This is the default low-friction
mode for local work.
* `danger-full-access`: The agent runs without sandbox restrictions. This removes
the filesystem and network boundaries and should be used only when you want
the agent to act with full access.
The common approval policies are:
* `untrusted`: The agent asks before running commands that aren't in its trusted
set.
* `on-request`: The agent works inside the sandbox by default and asks when it
needs to go beyond that boundary.
* `never`: The agent doesn't stop for approval prompts.
When approvals are interactive, you can also choose who reviews them with
`approvals_reviewer`:
* `user`: approval prompts surface to the user. This is the default.
* `auto_review`: eligible approval prompts go to a reviewer agent (see
[automatic review](/sandboxing/auto-review)).
Full access means using `sandbox_mode = "danger-full-access"` together with
`approval_policy = "never"`. By contrast, the lower-risk local automation
preset is `sandbox_mode = "workspace-write"` together with
`approval_policy = "on-request"`, or the matching CLI flags
`--sandbox workspace-write --ask-for-approval on-request`. You can then keep
`approvals_reviewer = "user"` for manual approvals or set
`approvals_reviewer = "auto_review"` for automatic approval review.
If you need the agent to work across more than one directory, writable roots let
you extend the places it can modify without removing the sandbox entirely. If
you need a broader or narrower trust boundary, adjust the default sandbox mode
and approval policy instead of relying on one-off exceptions.
When a workflow needs a specific exception, use [rules](/agent-configuration/rules). Rules
let you allow, prompt, or forbid command prefixes outside the sandbox, which is
often a better fit than broadly expanding access. For IDE-specific settings
entry points, see [ZeroTwo desktop app settings](/reference/settings).
Automatic review, when available, doesn't change the sandbox boundary. It's
one possible `approvals_reviewer` for approval requests at that boundary, such
as sandbox escalations, blocked network access, or side-effecting tool calls
that still need approval. Actions already allowed inside the sandbox run
without extra review. For the reviewer lifecycle, trigger types, denial
semantics, and configuration details, see
[automatic review](/sandboxing/auto-review).
Platform details live in the platform-specific docs. For native Windows setup,
behavior, and troubleshooting, see [Windows](/windows/windows-sandbox). For admin
requirements and organization-level constraints on sandboxing and approvals, see
[Agent approvals & security](/agent-approvals-security).
***
## Configure defaults
To start with the same behavior every time, set defaults in `config.toml`.
[Config basics](/config-file/config-basic) explains how it works, and the
[Configuration reference](/config-file/config-reference) documents the exact keys for
`sandbox_mode`, `approval_policy`, `approvals_reviewer`, and
`sandbox_workspace_write.writable_roots`. Use those settings to decide how much
autonomy the agent gets by default, which directories it can write to, when it
should pause for approval, and who reviews eligible approval requests.
At a high level, the common sandbox modes are:
* `read-only`: The agent can inspect files, but it can't edit files or run
commands without approval.
* `workspace-write`: The agent can read files, edit within the workspace, and run
routine local commands inside that boundary. This is the default low-friction
mode for local work.
* `danger-full-access`: The agent runs without sandbox restrictions. This removes
the filesystem and network boundaries and should be used only when you want
the agent to act with full access.
The common approval policies are:
* `untrusted`: The agent asks before running commands that aren't in its trusted
set.
* `on-request`: The agent works inside the sandbox by default and asks when it
needs to go beyond that boundary.
* `never`: The agent doesn't stop for approval prompts.
When approvals are interactive, you can also choose who reviews them with
`approvals_reviewer`:
* `user`: approval prompts surface to the user. This is the default.
* `auto_review`: eligible approval prompts go to a reviewer agent (see
[automatic review](/sandboxing/auto-review)).
Full access means using `sandbox_mode = "danger-full-access"` together with
`approval_policy = "never"`. By contrast, the lower-risk local automation
preset is `sandbox_mode = "workspace-write"` together with
`approval_policy = "on-request"`, or the matching CLI flags
`--sandbox workspace-write --ask-for-approval on-request`. You can then keep
`approvals_reviewer = "user"` for manual approvals or set
`approvals_reviewer = "auto_review"` for automatic approval review.
If you need the agent to work across more than one directory, writable roots let
you extend the places it can modify without removing the sandbox entirely. If
you need a broader or narrower trust boundary, adjust the default sandbox mode
and approval policy instead of relying on one-off exceptions.
When a workflow needs a specific exception, use [rules](/agent-configuration/rules). Rules
let you allow, prompt, or forbid command prefixes outside the sandbox, which is
often a better fit than broadly expanding access. For IDE-specific settings
entry points, see [ZeroTwo desktop app settings](/reference/settings).
Automatic review, when available, doesn't change the sandbox boundary. It's
one possible `approvals_reviewer` for approval requests at that boundary, such
as sandbox escalations, blocked network access, or side-effecting tool calls
that still need approval. Actions already allowed inside the sandbox run
without extra review. For the reviewer lifecycle, trigger types, denial
semantics, and configuration details, see
[automatic review](/sandboxing/auto-review).
Platform details live in the platform-specific docs. For native Windows setup,
behavior, and troubleshooting, see [Windows](/windows/windows-sandbox). For admin
requirements and organization-level constraints on sandboxing and approvals, see
[Agent approvals & security](/agent-approvals-security).